How to Get a Free Computer -- Build It From Cast-offs!
by Howard Fosdick © 2024 RexxInfo.org -- Share this under the open source CC-BY-ND license. (Please do not alter contents.)
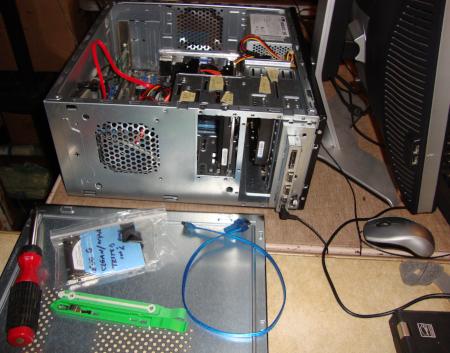
This free guide tells you how refurbish old computers, step by step.
So you can make that computer gathering dust in your garage or attic useful again.
If you don't have a computer at hand, I'll give you detailed instructions on how and where to pick up a free one. It's not hard if you know how.
The computer we'll build -- for free -- is fully capable for typical home or office use. These computers are exactly what I use myself, as a computer professional, and the exact same as I've built for others over many years in refurbishing computers.
Here's the agenda --
Step 1: Where to Get Your Free Computer
Step 2: What to Look For
Step 3: Clean the Insides and Identify Hardware
Step 4: Consolidation -> The Build
Step 5: Verify That All Hardware Works
Step 6: Determine Your Strategy for Booting, Storage, and Backups
Step 7: Prepare the Disk
Step 8: Select Your Software
Step 9: Install the Software
Step 10: Browse Efficiently
Conclusion
Contact / No Warranty
Read This First
- Before you open up any computer, always unplug it and turn it OFF! Protect yourself from a terrible electrical shock.
- Ground yourself before touching the inside of any computer. Otherwise, you might give it a static shock so tiny you won't even notice -- but it could kill your circuitry. Either buy a $10 USD anti-static wrist strap, or touch a metal object that will absorb a static shock prior to touching your computer's insides.
- For help in fixing hardware problems, get my free companion guide How to Fix Computer Hardware.
Step 1: Where to Get Your Free Computer
Perhaps you have a computer gathering dust in your garage, basement, or attic. If not, ask your family or friends if they do.
If you work in IT or any profession where computers are essential tools, ask your work friends. These folks sometimes get rid of perfectly good computers when they're no longer deemed state-of-the-art.
A request through social media, a Craigslist ad, or any of the many freecycle groups sometimes works. Freecycling is where people give away free items to find homes for them, rather than tossing them into the landfills. Here's how to find a local freecycling group, and here's a list of freecycling organizations.
Probably the best opportunity is city or town recycling efforts. Most have an electronics recycling program. Just drop by and gab with the staff, and many places will let you haul off whatever you like.
Two big factors help you find good used computers. First, environmental regulations. Most localities forbid residents from placing electronics into their trash. This means that people are often looking for somewhere to discard old computers. Most will welcome you to haul their old devices away, rather than going to the trouble of locating a recycling center and lugging their equipment to it themselves.
The second factor in your favor is planned obsolescence. Microsoft purposely obsoletes old hardware when they release new versions of Windows. For example, when Windows 11 came out, the word was that computers sold with Windows 7, 8, and 8.1 would not run 11. (Later Microsoft softened this stance, but many computer owners never heard about that.)
As a result, a wave of 7 and 8.x computers flooded the town dumps. The beauty of this -- from your standpoint -- is that these are working computers! They weren't discarded due to hardware failure. People tossed them simply because they thought they couldn't run Windows 11.
Of course, Windows 7 and 8.x computers run Linux just fine. Hence a big opportunity for you to pick up working hardware for free.
This phenomenon repeats itself nearly every time Microsoft releases a major new Windows version.

Wait! There Are Some Perfectly Good Computers In There! (Courtesy: EscrapRecycling, ElectronicReusingAssociationUS)
The economic level of the neighborhood you search in will determine how modern the computers you get are. Visit the town dump in a well-off suburb, and you'll see relatively recent computers tossed by white collar workers who require state-of-the-art equipment for their jobs. Or they'll discard an otherwise good five- to ten- year old computer because one part no longer works.
Visit a poorer neighborhood and the machines you'll encounter will be older, with more broken parts. Economically pressed folks keep their computers in service longer.
The lesson here is to visit your local recyclers in better-off towns and neighborhoods for the greatest success.
Incidentally, you should know that most "recycled" computers in the U.S. are not reused as computers, nor are they dismantled for their parts. Instead, the great majority are shipped to developing nations where they are destroyed into their constituent raw materials. Only those raw materials are recycled.
Step 2: What to Look For
To be successful at acquiring useful computers you need to know what to look for.
Always look for any stickers and license labels on the computer. Also look for manufacturer's labels, which often
tell when a computer was made.
For desktops, this means check front and back; for laptops, check the bottom and open them up to check below the keyboard.
Stickers tell you what version of Windows the computer shipped with. Windows 7 or better is good. That's usually a multi-core computer, or at least a late-model dual-core. Items predating Windows 7 release in 2009 can be fun to work with, but aren't optimal for our purposes. You can almost certainly get better hardware if you try.
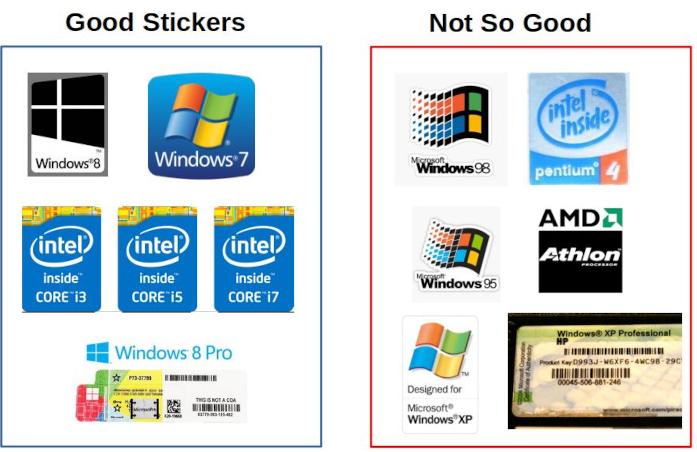
Good and Bad Stickers Tell the Tale (Courtesy: the Vendors)
Also look for CPU stickers from Intel or AMD that disclose the age and power of the computer. Multi-core CPUs are good, dual-core are "meh", and single core are unacceptable from the standpoint of this article. Multi-cores date back to roughly 2010 and dual-cores to about 2005.

Computer Generations (Courtesy: the Author)
If you have the time, look up computer makes and models on your cell phone. Google for their "specs" or "specifications." This will give you a quick assessment of what you're looking at.
Always take more than a single computer if at all possible. Why? You'll find that many people remove (or destroy) their disk drive. Or perhaps they'll remove the memory. Or maybe one computer has a defect that another addresses.
Taking several computers greatly increases the chances you can build one really nice machine.
Remember to take cords. Two for desktops: one for the monitor, and one to connect the computer to the wall socket. And peripherals like keyboards, mice, speakers, and headphones.
For laptops, make a real effort to find the power adapter (with its cords) for the model you take. Most of these are model-specific, and if you can't find it when you take the laptop, you'll be on the hook for securing one later.
If you're building a desktop and need a display, grab a few monitors. It's pretty surprising, but some people toss working screens because they get a new one bundled when they buy a new computer.
If you take an LCD monitor that doesn't work, be aware that most fail due a leaky capacitor. You can easily replace this $5 part if you have a soldering tool set. Just watch a couple how-to videos. If you have to purchase a display, in the U.S., Goodwill is a good source of very inexpensive used monitors.
Once you've got your computers, visit the manufacturers' websites to download documentation specific to those models. These manuals provide essential machine-specific documentation.
Step 3: Clean the Insides and Identify Hardware
The next step is to open up the computers. Start with the newest one, or the one you think is most powerful, or that is in the best shape. You have two goals now:
- Clean everything
- Identify the hardware you have
Whenever you open up a computer, ensure the machine is unplugged from wall sockets -- that the power is OFF -- and that you have grounded yourself!
Grounding yourself means removing any possible electric charge from your body so that you don't transfer any electricity to computer components. Give your computer a very tiny static shock -- so tiny you can't even feel it -- and you might destroy its circuitry. Ground yourself using an anti-static strap, or by frequently touching conductive metal (such as a detached computer case).
Now you want to give the machines a thorough cleaning. Since you can't safely rub electronics with a rag or cloth -- that might generate static electricity -- use a can of compressed air to blow out all the dust and dust bunnies. Or delicately use a soft-bristle brush. Be sure you clean the CPU complex, all circuitry, computer fans, the power supply area, the air vents, and anywhere else dust could accumulate.
Cleaning is vital because heat is what kills electronics. And when dust covers circuitry or clogs vents, extra heat is the result.
Cleaning is especially important for laptops. Many are discarded due to overheating that their owners don't know how to recognize and fix. You're fixing it and getting a free computer in exchange.
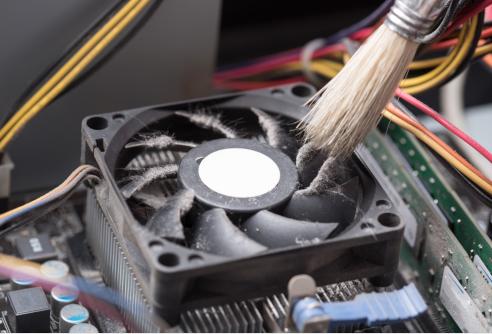
Cleaning Out the Dust Extends the Life of the Computer (Courtesy: ScienceABC.com)
Once you've thoroughly cleaned, you want to identify all the hardware you have. Write down the information from the disk drive label, the motherboard label, the kinds of memory, how many memory sticks there are and how many slots are open, and any other hardware characteristics you can.
You'll notice immediately what devices each computer has. And if any are missing. This is why you grabbed several computers. It sometimes takes two or even three old computers to create a single complete one with all necessary components.
Step 4: Consolidation -> The Build
Assuming you picked up a couple computers, now is the time to compare their hardware. Then you can select the best one to build up. You may well transfer some parts from the other computers into your "build machine." Ideally, I like to build a computer with a minimum of 4 gigabytes of memory and a disk drive for storage.
Here's an example of how this works. Once I picked three similar desktops. Two had 2 gigabytes of memory, and the third had no memory at all. Only the one without memory had a disk drive. So I consolidated all the memory and the disk into the computer with the most powerful processor. This created a single very capable computer.
For desktops, you'll find that many parts are exchangeable across a wide range of computers. Display monitors, disks, insertable cards, power supplies, keyboards, mice, and fans are examples. And often memory.
Laptops have fewer shareable parts since everything is crammed into a small proprietary case. But external items like headphones, thumb drives, and external disk drives can be shared. Memory may be transferrable between machines of similar ages, and power adapters often work for laptops made by the same manufacturer.
Memory: Memory is one resource that really distinguishes computer generations. You have to match up the notches on the memory sticks to the open slots on the motherboard that you insert the memory into. This photo shows how desktop memory generations are defined by their notch locations:
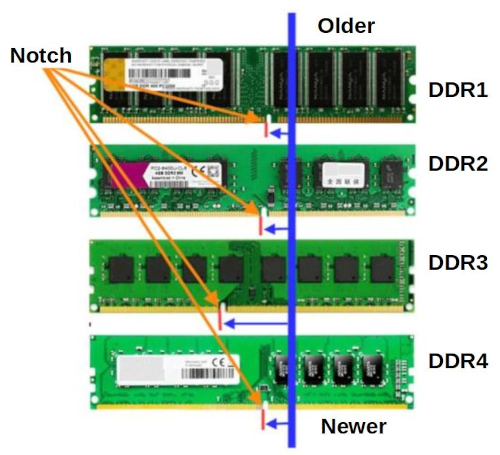
Memory Generations are Defined by Their Notches (Courtesy: MrDustBin/Author)
It's helpful to look up memory sticks online first before you insert them into position. The Kingston and Crucial websites are especially useful for this. You enter the make and model of your computer, and those websites recommend which memory sticks will work. They'll also tell you the maximum allowable memory for your computer. (Otherwise you might accidentally insert memory your computer can't take advantage of.) You don't have to buy anything to use these free memory analysis tools.
When inserting memory, if a stick doesn't fit in one direction, try inserting it the opposite direction. You may have just had the stick reversed.
If the stick still doesn't fit, don't force it. The notches are there to prevent you from placing the wrong memory into the computer.
In general, if a memory stick fits the slot, it should work. But there are exceptions. That's why those online memory advisors are helpful. You can also take an experimental approach. If a memory stick fits into a slot, it won't hurt anything to try it and see if it works.
Mixing memory of different speeds or from different manufacturers runs the risk of running all the memory at the speed of the slowest stick. But in practice you probably won't notice any difference.
Build Advice: If you need more detailed information on how to work with your hardware, get my free companion guide How to Fix Computer Hardware. It will help you solve nearly any problem you run into.
Leftovers: After you're done creating your build machine, what should you do with the computers that are left over? You can make them whole by further scrounging or by buying needed part(s). Or, just use them for parts. In the worse case, you can always give them to an electronics recycler.
Step 5: Verify That All Hardware Works
Once you've created your build computer, you need to verify that all the hardware works.
It's essential to do a very thorough job of this. There's nothing worse than being further along and then finding out that something doesn't work because you didn't test it enough now. That can really waste your time.
You need to test all the computer's parts:
- Processors (CPUs) and motherboard circuitry
- Memory
- Disks
- All peripherals -- Sound, microphone, USB ports, networking ports, keyboard, mouse, display, fans, etc
Most computers have diagnostic capabilities built in that enable you to test these components. You access them through the Configuration or Setup panels. These are also referred to as the UEFI, BIOS, or UEFI/BIOS panels.
You press a specific key while the computer boots to access the Configuration panels. The brand of computer determines which key that is. Normally it is either F1, F2, F10, F12, DEL, or ESC. Most computers will display which during the boot process.
If you don't know which key it is, you can hit a slew of the keys I just listed and it's likely you'll get in.
Or look up the proper key for your computer in this chart.
Once you're in the Configuration panels, you should be able to run diagnostics to verify most or all major components.
You'll also be able to view hardware information about the processors, memory, disks, devices, and more. Plus you can set various hardware configuration parameters.
Setup panels vary by manufacturer; this one is typical. You can see how it lets you gather hardware information and set hardware operating parameters. Here the diagnostic tests are gathered under the label PC Health Status:
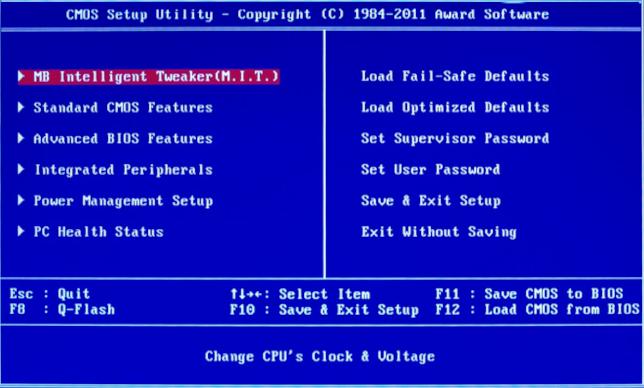
A Typical UEFI / BIOS Menu for a Mature Computer (Courtesy: UselessComputerBlogspot)
If the Configuration panels don't include diagnostics to test all the hardware, you can download the free Ultimate Boot CD. It contains a complete set of diagnostics. It boots independently of any operating system, as a standalone "Live USB" or "Live DVD".
(Here's how to create a Live USB. And here's what to do it fails to boot your older computer.)
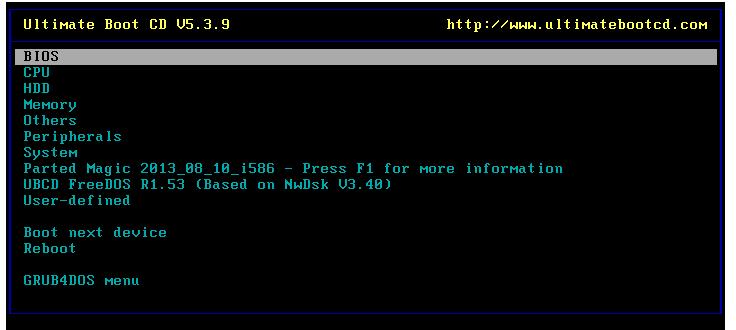
Testing Everything with the Ultimate Boot CD (Courtesy: UltimateBootCD.com)
If you find any problems, most are easy to fix. Just access my free complete guide How to Fix Computer Hardware.
Step 6: Determine Your Strategy for Booting, Storage, and Backups
Now you've got a computer with sufficient resources (memory and devices) and you've verified that all this hardware works. The next step is to figure out your storage strategy for the computer. You need to answer three questions:
- How will you boot it?
- What will you use for your primary storage device?
- What will you use for your data backup device?

Common Strategies for Booting, Storage, and Backup (Courtesy: H. Fosdick)
Many mature computers were designed for booting and storage with a hard disk drive (HDD).
Perhaps your computer has a solid state disk (SSD) instead. That's much faster than an HDD. Its speed is especially welcome with mature hardware that may underperform in other areas like processing speed or memory access.
Maybe whoever discarded the computers you picked up yanked out all their disks and you don't have a single drive! In this case, you can go back to scrounging for what you're missing. Or select one of these alternatives:
- Option 1: Buy a new HDD
- Option 2: Buy a new SSD
- Option 3: Go diskless, and use a USB thumb drive to boot and store data
Let's discuss these options.
Option 1: Buy a new HDD. HDDs generally offer more storage at lesser cost than SSDs, but SSDs are much faster. HDDs are down to $20 USD these days for the lesser capacities.
Option 2: Buy a new SSD. SSDs cost more per byte than HDDs but their faster speed can really aid performance for an older computer. Some now sell for as little as $25 USD.
If you're refurbishing a desktop, whether you decide for an HDD or SSD, consider buying a 2.5" laptop-sized disk. They weigh less and can be more easily mounted on many systems, without worrying about how they fit into proprietary disk cages.
If you're refurbishing a laptop, you could run into a situation where the thickness of the drive matters. For a drive that's too thin, you can often make up the difference just by taping an old credit card (or similar plastic card) to the bottom of the disk. The tighter fit helps ensure that the connectors fit snugly and securely. Of course, if the drive is too thick, you have no option but to find another drive.
Option 3: Go diskless, and use a USB thumb drive to boot and store data. This strategy assumes your computer will boot from the USB drive. (Most will if they're less than 15 years old, but you'll have to test it and see).
This strategy can be useful if you have no HDDs or SSDs available and would prefer to use a USB at hand rather than scrounge for or buy a disk drive.
To make this work, you'll need to select a suitable operating system. We'll discuss this later.
If you opt for the USB-only strategy, be aware that there are huge differences in USB data transfer speeds. A fast port and fast USB drive will greatly improve overall performance:
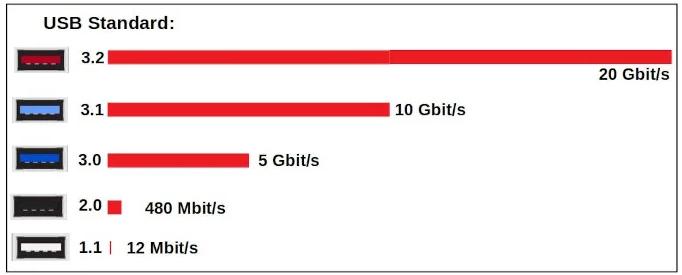
USB Speeds Vary Enormously (Courtesy: H. Fosdick at OpenSource)
You need to verify the speeds of both your USB port and the USB thumb drive you use. If there's a mismatch, the data transfer speed you'll get is the lower of the two.
You can upgrade your USB port speeds by buying a fast port card for $20 USD or less. Upgrade your USB thumb drive by buying a new one and paying attention to which USB standard it meets.
Backups: Be sure you've also decided to what device you'll back up your data. Data backups are absolutely essential in case your primary storage device fails! So be prepared in advance. Obviously, your backup must be to a different device than that used for your primary data storage.
Optical Drives: Old desktops and some old laptops include optical disc drives. Some people like to keep them for use with their DVD or CD libraries, while others see no use for them. (After all, modern removable USB thumb drives hold more
data and are faster than optical discs.)
Removing an optical drive frees up a set of disk connectors and some cabinet space, as well as improving airflow. So remove the optical drive unless you're sure you'll use it.
Step 7: Prepare the Disk
If you decided to reuse either an existing HDD or SSD, you have to prepare the disk for use. (I assume you've already thoroughly tested the disk to ensure that it's working without error.)
Now you need to completely erase the disk. This is vital because you don't know what's on there, and you could be held responsible for it someday. For example, the disk could contain illegally pirated software, stolen films, hacked data, underage pornography, or literally anything.
Do not try to save the old Windows software on the disk. You want to run a modern, currently-supported operating system, not an obsolete one vulnerable to viruses and malware. Plus, only by erasing the entire disk can you be certain that you've got nothing bad left on there.
For an HDD: Download and run a free tool like DBAN or a competitor. These programs overwrite the entire disk and thereby destroy all its data.
These "disk wiping" programs usually have options for either light wiping (faster) or more thorough wiping (slower). To ensure the data is truly unretrievable, use the thorough settings. This often runs for hours -- it depends on your disk's size and speed. You may find it convenient to run a thorough wipe overnight.
For an SSD: You need a different kind of tool called a secure erase. An HDD erase tool will not adequately erase an SSD!
Some computers come with an secure erase utility in their UEFI/BIOS. All you have to do is access the boot configuration panels to run it. It will usually be labelled something like "ATA Secure Erase."
The other option is the website of the disk manufacturer. Most offer free downloads of secure erase utilities for their SSDs.
If the vendor doesn't provide a secure erase utility for drive, your only option may be to purchase a tool like Parted Magic for $15 USD. Or, don't use the disk.
Step 8: Select Software
With all the hardware in order, it's time to select the software you'll use.
You need two kinds of software:
- An operating system
- Applications
Fortunately most Linux distributions (or products) bundle both. That is, by virtue of installing the distro you get both a complete operating system and a full set of applications. These apps fulfill any typical home or office use of the computer. All this software is free.
To choose the appropriate Linux distribution for your computer, analyze your computer's power.
With an Intel i-series processor and 4 gigabytes of memory or more, you have the power needed to run almost any Linux distribution. Products like MX Linux, Linux Mint, and Ubuntu are quite popular. You can run just about any desktop environment (graphical user inteface) you like.
With 2 to 4 gigabytes of memory, you have to be a little judicious in your memory use. A distribution with a lightweight graphical interface would be best, because GUIs are known for their heavy resource consumption. Examples are Linux distros with a desktop environments like XFCE, LXDE, and LXQt. I've had good experiences with Linux Mint/XFCE. There are many fine alternatives.
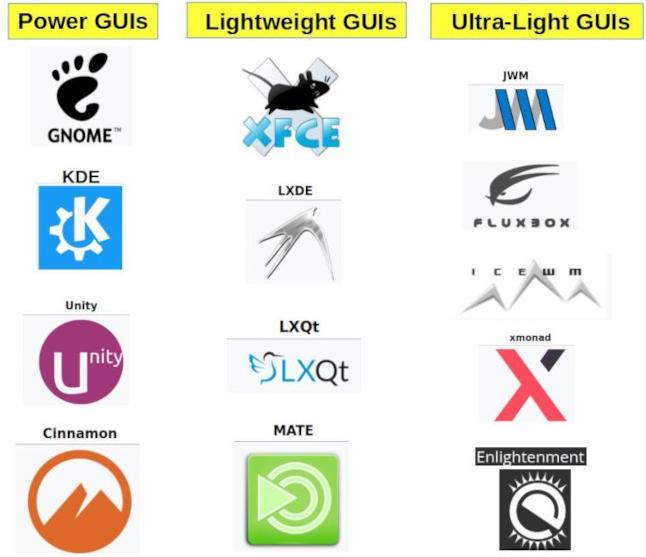
Lightweight or Ultra-light GUIs Work Better on Older Computers (Courtesy: H. Fosdick)
If your computer has even less memory, go for an "ultra-light" Linux distribution. This should probably also be your choice if you have an old dual-core CPU.
For these computers, I've found both antiX and Puppy Linux excellent. Not only do they consume less computer resources, they also support older computers. They can help with issues like CPUs that don't have all the newer capabilities, older devices, older BIOS, and more.
Both antiX and Puppy bundle low-resource apps. Their graphical interfaces are ultra-light windows managers, instead of full-fledged desktop environments. Their only downside is that their user interfaces are a tad less user-friendly than those of bulkier Linux distributions.
What if you have a computer that boots off a slow device -- like an old HDD, slow USB, or optical drive -- but has lots of memory? You can set up antiX or Puppy to load itself into memory and run from there. This increases the responsiveness of your computer for operations that might otherwise be slowed down by a sluggish device.
For these reasons, I've found antiX and Puppy ideal for mature computers that have very limited hardware resources.
On the other hand, if a computer has enough memory (say, at least 4 gigabytes), I choose an easier-to-use though heavier distribution. I can personally vouch for Mint/XFCE and there are dozens of excellent choices including popular favorites like MX Linux and Ubuntu.
USB-only systems: As mentioned earlier in the section on Determine Your Strategy for Booting, Storage, and Backups, if you go diskless and use a USB thumb drive to boot your system and for data storage, you'll want a distro that requires very little space. After all, you'll want space left over on your USB for data storage. antiX can boot from a Live USB in two gigabytes, while Puppy requires less than one gig.
I often use one USB drive for booting and the operating system, and a second one for personal data storage.
For the USB-only strategy, you'll also require an operating system that supports persistence. This is where the OS stores its state on the pen drive across boots (sessions). Both antiX and Puppy support persistence, as do some other distributions.
Laptops: Since heat is the killer of old laptops, install a temperature monitor program. Then take a look at it to ensure that temperatures are not getting too high, and that all fans are spinning properly. This is smart because
so many laptops are discarded due to overheating. A temp guage is also handy going forward.
Step 9: Install the Software
To install your software, you create a "Live USB", a USB thumb drive that boots the operating system you want to install. Then you start up the computer with it, and follow its installation instructions.
Before you try booting, check the target computer's Configuration panels. Verify that USB Boot is enabled, that the USB drive is listed as the first or default boot option, and that SECURE BOOT is OFF.
When viewing the Configuration panels, you might discover that your old computer doesn't support a Live USB. In this case, you'll need to create a "Live DVD" and boot off that. Set the Configuration panels to recognize your DVD as its first boot choice.
For a step-by-step explanation on how to create a Live USB or DVD, see this brief tutorial.
If Live Booting Fails:
You created a "Live USB" or "Live DVD" -- and it doesn't boot. The computer sits there dead. What do you do?
First check whether the USB port you used is dead. Plug some other USB device into there to see if the computer recognizes it. Then verify that the USB thumb drive you're using is good. Plug it into another machine to see if it is recognized and its files can be read.
If both the USB port and stick are good, the most likely explanation is a firmware mismatch. That is, there are two standards on how to create a bootable USB: the older legacy or BIOS standard, and the newer UEFI standard. You have to match the Live USB and the target computer to use the same standard (either BIOS or UEFI). Otherwise, the boot fails.
The target computer's Configuration panels might give you a choice between BIOS and UEFI firmware for booting. Try setting it to the opposite value and boot again. BIOS is often denoted by the terms BIOS, legacy boot, Compatibility Support Module, or CSM. UEFI is usually called UEFI or Default booting.
Alternatively, you can leave the computer's Configuration unchanged, and instead create a Live USB to match the Configuration panel's standard. A free tool like Rufus lets you do this. If you still have problems, here's a complete discussion that explains several other solutions.
Step 10: Browse Efficiently
Congratulations, you now have a fully capable computer!
One last topic is important.
How you browse the web can have a huge impact on your computer's responsiveness. Good browsing practices can make even an old computer feel snappy. Browse without giving thought to this, and you could really bog down your machine.
Here are tips for efficient browsing:
- Block ads and trackers. At many websites, they consume over half your browsing resources! If you can offload your ad blocking from your computer to your VPN, that's ideal.
- Turn off autorun of videos and audio.
- Limit concurrency. Don't perform other resource-consuming activities while you surf. Use a scheduler to automatically run them in off-hours. Examples include big downloads, updates to the operating system and its apps, and time-consuming batch processing.
- Open only one browser at a time. Start only a single copy of it.
- Limit the number of tabs you open. Close tabs you're no longer using.
- Manually control processing in each browser tab. Example: open the browser and access a website. While you're reading it, open a second tab and allow it to load in the background. If you open a third tab, you can choose whether to allow it or the second tab to process, depending on what you'll view next. Manually starting and stopping tab processing like this can be helpful when dealing with a CPU-challenged computer.
- Toggle JavaScript on and off. This has greatest benefit when you run across a website with poorly written JavaScript.
- Consider using a lightweight browser. Some sacrifice features for speed and minimal resource use, but they're worth looking into if those measures are your top concern. Examples include Dillo, Luakit, and Lynx. Find more here or here. You can test the speed of different browsers at this website.
Individually, each of these tips has little impact. However, as a group they can make a huge difference in how you experience the web when using a mature computer.
Conclusion
After you do a few builds, you'll probably shift around some of the steps I've outlined here. But that's the gist of it.
Anyone can build a free computer if they know how to go about it. I hope this article has given you the information you need to do exactly that.
You may also find my free complete guide helpful -- How to Fix Computer Hardware.
Contact / Feedback
Please send any recommendations for improving this article --> gibberish@googel.com webmasterA an-at-sign-goes-here RexxInfo a-period-goes-here org more-gibberish@aol.com. Thank you.
About the Author
Howard Fosdick is an independent consultant who supports databases and operating systems. He's refurbished old computers for fun and for charity for many years. Read more how-to's and tutorials here.
No Warranty / Use This Information At Your Own Risk
The information and links in this document are are provided "as is" and without any express or implied warranties of any kind whatsover. Use of this document constitutes your agreement to this statement of No Warranty and that you perform any activities solely at your own risk.
-----------------------------------
====> Like this free article? Please spread the link love to Slashdot, LXer, or wherever. Thank you.